
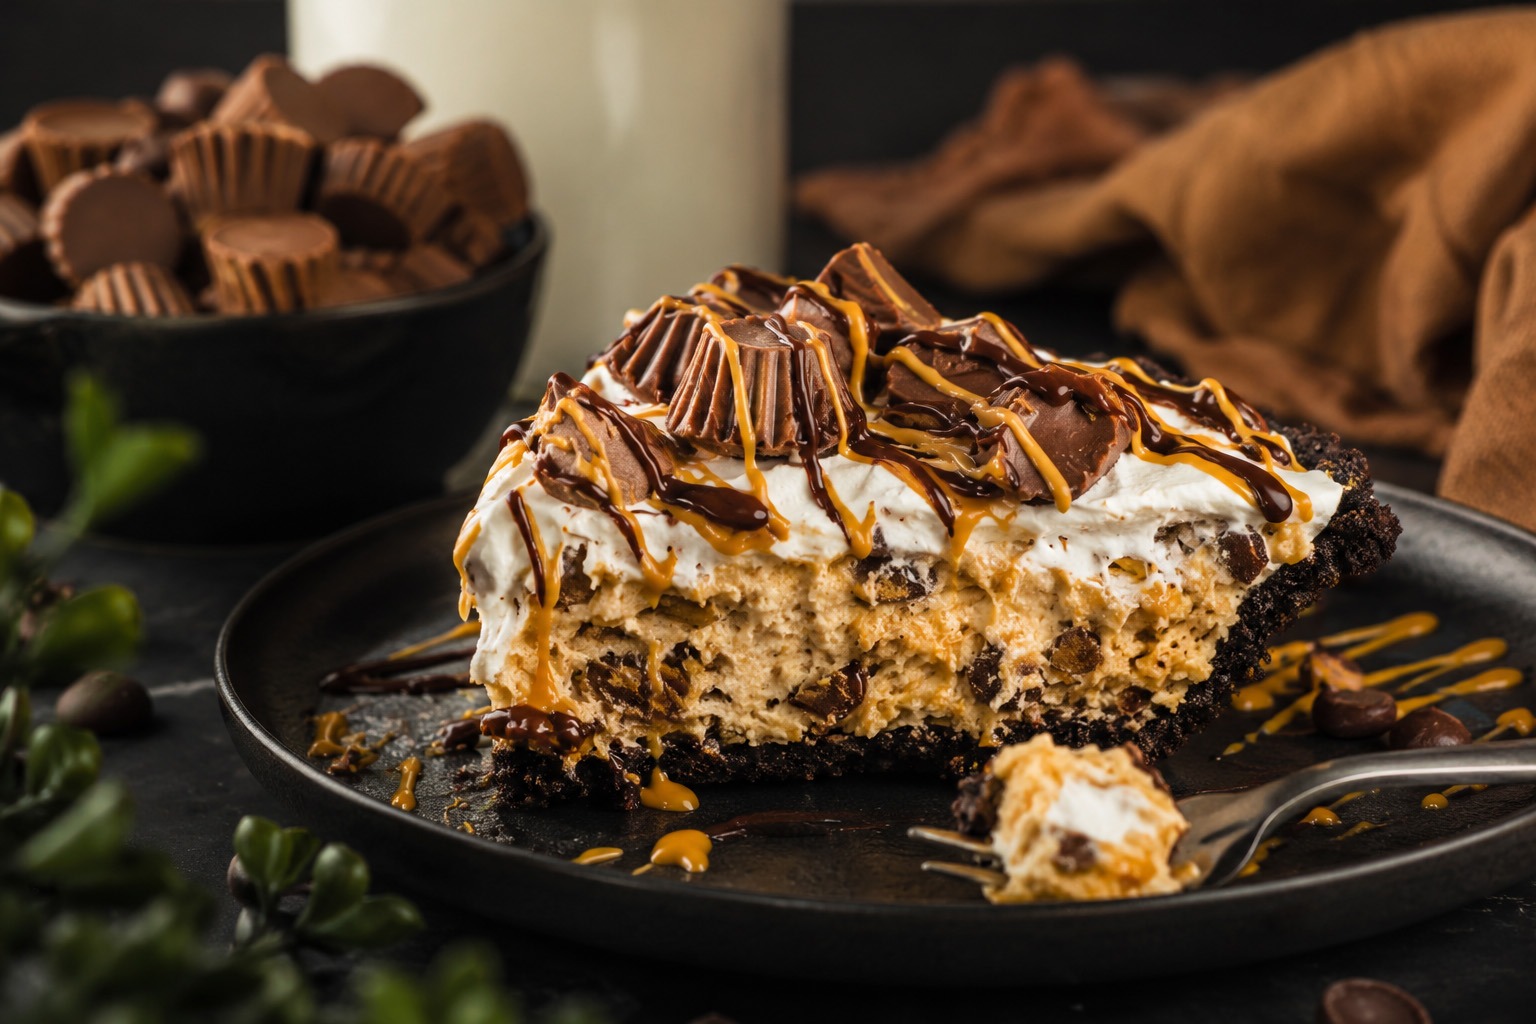
This is the sort of dessert that unapologetically embraces indulgence. A cloud-like peanut butter filling, whipped until impossibly light, nestles inside a crisp chocolate crust before being crowned with generous chunks of peanut butter cups. Every forkful melts into a rich blend of silky chocolate and roasted peanut butter, balancing creamy sweetness with just enough salt to keep you reaching for another bite. Effortless to make and gloriously decadent, it’s the kind of no-bake showstopper that disappears almost as quickly as it’s served.
There are few flavour pairings more irresistible than chocolate and peanut butter, and this pie celebrates them with unapologetic generosity. It begins with a deeply chocolatey biscuit crust that provides the perfect contrast to a feather-light peanut butter filling, whipped until smooth, airy and impossibly creamy. A lavish scattering of miniature peanut butter cups crowns the top, adding little pockets of chocolate-coated indulgence in every slice. Best of all, there’s no need to switch on the oven. Simply assemble, chill, and let time work its quiet magic before serving a dessert that feels every bit as impressive as it tastes.
Prepare
Chill Time
Serving
Reese’s Peanut Butter Cup Indulgence Pie Ingredients
For the Chocolate Biscuit Crust
-
Oreo biscuits – The classic variety, complete with their creamy centres, create the perfect intensely chocolatey base while naturally helping the crumbs hold together. The standard biscuits work best here, rather than the thinner or extra-filled versions.
-
Unsalted butter – Melted and stirred through the crumbs to create a firm, buttery crust with a satisfying snap once chilled.
A little shortcut: If time is short, a ready-made chocolate cookie pie crust makes an excellent stand-in.
For the Peanut Butter Filling
-
Full-fat cream cheese – Softened until silky to ensure a perfectly smooth filling without a single lump.
-
Creamy peanut butter – Rich, smooth and deeply nutty, it forms the heart of this dessert. Choose a good-quality brand with a flavour you love.
-
Icing sugar – Dissolves effortlessly into the mixture, lending sweetness while keeping the filling luxuriously smooth.
-
Vanilla extract – Just enough to round out the chocolate and peanut butter with a gentle warmth.
-
Mini Reese’s Peanut Butter Cups – Folded throughout the filling, these little pockets of chocolate and peanut butter provide delightful bursts of texture and flavour. If you can’t find the miniature version, chopped full-sized cups work beautifully too.
-
Whipped topping – Folded in at the very end, this transforms the filling into something impossibly light and cloud-like. A good-quality whipped topping, thoroughly thawed, will give the pie its signature airy texture.
For the Finishing Touches
-
Mini Reese’s Peanut Butter Cups – Scatter generously over the top, leaving some whole and chopping others for an eye-catching finish that promises indulgence before the first bite.
-
Warm chocolate fudge sauce – A glossy drizzle adds an extra layer of chocolate richness.
-
Melted peanut butter – Swirled over the top for a luxurious finishing flourish that makes every slice look as decadent as it tastes.
Every ingredient has its role to play, but together they create something far greater than the sum of their parts—a chilled dessert that’s creamy, rich, wonderfully light, and impossible for any chocolate and peanut butter lover to resist.
How to Make Reese’s Peanut Butter Cup Indulgence Pie
Step 1 | Create the Chocolate Biscuit Crust
Place the whole Oreo biscuits—creamy centres included—into a food processor and blitz until they resemble fine, dark crumbs. Pour them into a bowl, add the melted butter, and stir until every crumb is coated and the mixture resembles damp, buttery sand.
Tip the crumbs into a 23cm (9-inch) pie dish, pressing them firmly across the base and up the sides to create an even shell. Using the base of a measuring cup or the back of a spoon makes this wonderfully easy. Transfer the crust to the freezer for around 30 minutes, allowing it to become beautifully firm while you prepare the filling.
Step 2 | Whip the Peanut Butter Filling
In a large mixing bowl, beat the softened cream cheese until perfectly smooth before adding the creamy peanut butter and icing sugar. Continue beating until the mixture becomes thick, glossy and completely velvety.
Pour in the vanilla extract and mix briefly, then gently fold through the whipped topping. The transformation is almost magical, turning the rich mixture into something remarkably light, airy and mousse-like. Finally, scatter in the miniature peanut butter cups, folding them through so every slice will be filled with little pockets of chocolate-coated indulgence.
Step 3 | Assemble the Pie
Remove the chilled crust from the freezer and generously spoon in the peanut butter filling. Smooth the surface into soft, elegant swirls rather than striving for perfection—the rustic finish somehow feels even more inviting.
Spread a final layer of whipped topping across the pie before showering it with chopped mini Reese’s Peanut Butter Cups, leaving a few whole to create a striking centrepiece. The more generous the topping, the more irresistible the finished dessert becomes.
Step 4 | Chill to Perfection
Place the pie in the refrigerator for at least four hours, although an overnight chill rewards you with beautifully clean slices and an even silkier texture.
Just before serving, finish with leisurely ribbons of warm chocolate fudge sauce and melted peanut butter, allowing them to cascade over the top. The result is a gloriously decadent dessert—cool, creamy, rich with chocolate and peanut butter, and every bit as spectacular to look at as it is to eat.
Kitchen Tips for the Perfect Reese’s Peanut Butter Cup Indulgence Pie
A handful of thoughtful touches will transform this simple no-bake dessert into something worthy of a special occasion.
-
Choose miniature peanut butter cups whenever you can. Their generous chocolate coating and bite-sized shape distribute beautifully throughout the filling, while a mixture of whole and chopped pieces creates an eye-catching finish. If miniatures aren’t available, chopped full-sized peanut butter cups are an excellent alternative.
-
Bring the cream cheese to room temperature. This is perhaps the most important step of all. Softened cream cheese blends effortlessly into a silky, luxurious filling, while chilled cream cheese is far more likely to leave unwanted lumps behind.
-
Press the crust firmly. Using the flat base of a measuring cup or a sturdy glass helps compact the biscuit crumbs into an even layer, creating a crust that slices neatly and holds its shape.
-
Don’t rush the chilling. Because this is a true no-bake dessert, the freezer and refrigerator do all the hard work. A brief spell in the freezer allows the crust to become wonderfully firm before the filling is added.
-
Use a rich, stable whipped topping. Whether you choose a quality ready-made whipped topping or lightly whipped fresh cream, the goal is the same: an airy filling with enough structure to hold every beautiful slice.
-
Patience rewards perfection. Four hours in the refrigerator is the absolute minimum, but leaving the pie overnight allows the filling to set into an irresistibly smooth, mousse-like texture while the flavours deepen beautifully.
-
For beautifully clean slices, chill a little longer. Fifteen to thirty minutes in the freezer before serving gives the pie just enough extra firmness for elegant, bakery-worthy portions. A sharp knife dipped in hot water and wiped clean between each cut will leave every slice looking immaculate.
-
Finish at the last moment. Drizzle over warm chocolate fudge and melted peanut butter just before bringing the pie to the table. The glossy ribbons create a dramatic contrast against the chilled filling and make every slice look wonderfully irresistible.
The beauty of this dessert lies in its simplicity. With just a little patience and a few careful details, you’ll be rewarded with a pie that’s every bit as luxurious as one from a fine pâtisserie—rich, feather-light and impossible to resist.

Print & Share


Reese’s Peanut Butter Cup Indulgence Pie
Ingredients
Method
-
Place the Oreo biscuits, creamy centres and all, into a food processor and blitz until they become fine, even crumbs. Add the melted butter and pulse briefly, or stir by hand in a large bowl, until every crumb is coated and the mixture resembles rich, buttery sand.
-
Tip the mixture into a 23cm (9-inch) pie dish and press it firmly across the base and up the sides, creating an even shell. Using the base of a measuring cup or a sturdy glass makes this wonderfully simple and gives a beautifully smooth finish.
-
Transfer the crust to the freezer for around 30 minutes, allowing it to firm up while you prepare the filling.
-
In a large bowl, beat together the softened cream cheese, smooth peanut butter and icing sugar until the mixture is completely silky, light and free from any lumps. Stir in the vanilla extract before gently folding through the whipped topping, preserving as much air as possible to create a mousse-like texture.
-
Finally, fold in the chopped miniature Reese’s Peanut Butter Cups, ensuring they’re evenly distributed throughout the filling so every slice is studded with little bursts of chocolate and peanut butter.
-
Spoon the filling into the chilled Oreo crust and smooth the surface with the back of a spoon or an offset spatula.
-
Spread the remaining whipped topping over the pie, creating soft swirls rather than a perfectly flat finish. Scatter generously with chopped Reese’s Peanut Butter Cups, leaving a handful whole to create an irresistible centrepiece.
-
Refrigerate the pie for at least 4 hours, although an overnight chill will reward you with a firmer texture, cleaner slices and an even richer flavour.
-
Just before serving, drizzle each slice with warm chocolate fudge sauce and ribbons of melted peanut butter for the ultimate finishing touch.
-
Cover and refrigerate for up to 5 days. Alternatively, freeze for up to 1 month. Allow the pie to soften in the refrigerator before serving so the filling returns to its wonderfully creamy texture.
Notes
- Choose classic Oreo biscuits. Their familiar balance of crisp chocolate biscuits and creamy vanilla filling creates the richest flavour and the perfect texture. The thinner or extra-filled varieties don’t produce quite the same beautifully sturdy crust.
- Either salted or unsalted butter will work. Salted butter lends a subtle savoury note that balances the sweetness of the chocolate and peanut butter, while unsalted butter offers a more delicate finish. Use whichever you prefer.
- Press with confidence. Compacting the crumbs firmly into the pie dish creates a crust that holds together beautifully when sliced. The flat base of a measuring cup is ideal for achieving an even, professional-looking finish.
- Freeze rather than bake. A short spell in the freezer allows the butter to firm up, creating a wonderfully crisp crust while keeping the recipe entirely oven-free.
- If you prefer a baked crust… Preheat the oven to 180°C (160°C fan/Gas Mark 4). Prepare the crust as directed, then bake for around 10 minutes until lightly set. Allow it to cool completely before filling. Baking produces a slightly firmer crust with an even deeper chocolate flavour.
A well-made crust is the quiet foundation of this dessert—rich, crisp and sturdy enough to support every generous layer without ever stealing the spotlight from the luxurious peanut butter filling.
Discover more from Table Number Seven
Subscribe to get the latest posts sent to your email.